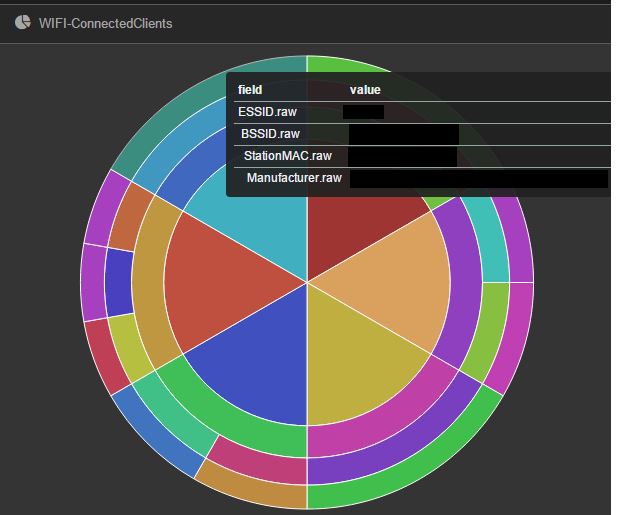
We can imagine a face of a person in a CFP review board that sees our paper submitted to a conference. “Oh no, another Wi-Fi talk”. But after reading it through one can see Wi-Fi from a different angle. We are presenting a way how to cross from terminal output of Wi-Fi packets to big data and visualization.
Author: WWW Editor
#hekerji.si
We are proud to share our knowledge in the first Slovenian documentary film about hackers. Do they really exist in Slovenia? Who they are? What is their motivation?
The TV premiere will be on December 17, 2015, on channel TV SLO 2 at 8 PM.
Recently I ran across an interesting challenge. Some friends had problems with their service. Providing brand new service and having someone on the other side executing DDoS this service is not a very promising beginning for some startups. Therefore, I decided to tackle this challenge and in the end, it was not very hard to find leakage.
I know what you forgot last summer – DNS
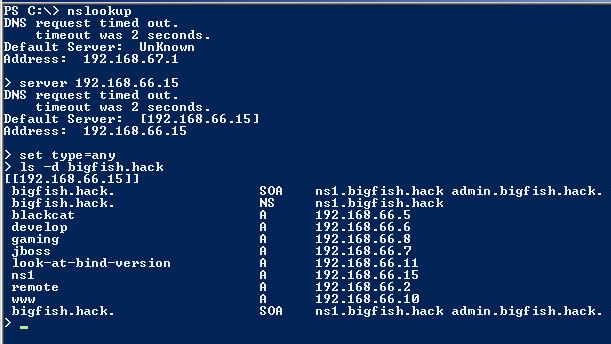
After preparing and organizing some CTF events we discovered that players struggle at a particular task. Often forgotten to look at it, but it is a must-do in every penetration test. We are talking about a misconfigured DNS server that allows zone transfers from any source. This post is not about explaining details of a zone transfer, but rather about how to initiate one in Linux or Windows, and if you want to learn more look DNS zone transfer. Let’s take for example a company named BigFish that owns the domain bigfish.hack. We discovered that on IP address 192.168.66.15 on TCP port 53 is listening a DNS server that resolves domain names for bigfish.hack. To initiate a DNS zone transfer manually from Windows we should use commands in the picture below.
Wi-Fi security in Ljubljana
Here is a short story about access points (AP). We were wardriving through Ljubljana with a mission to analyze the security of Ljubljana’s Wi-Fi network. Our focus was collecting information about different authentication types in use. The goal was to capture a representative set of information about AP’s so that some assumption about security of Wi-Fi could be given. The only hardware we used was our Android mobile phone with the great Wigle Wifi Wardriving Android application. We already had a large database and we combined it with a smaller one that was obtained fresh from wardriving. The next step was to narrow down the area. Wigle Wifi app stores information about AP’s in a local SQL-lite database, so limiting the area was a piece of cake.
Query bellow was enough.
select * from network where bestlat>45.98 AND bestlat < 46.14 and bestlon>14.42 and bestlon < 14.64 and bestlon > 14.41
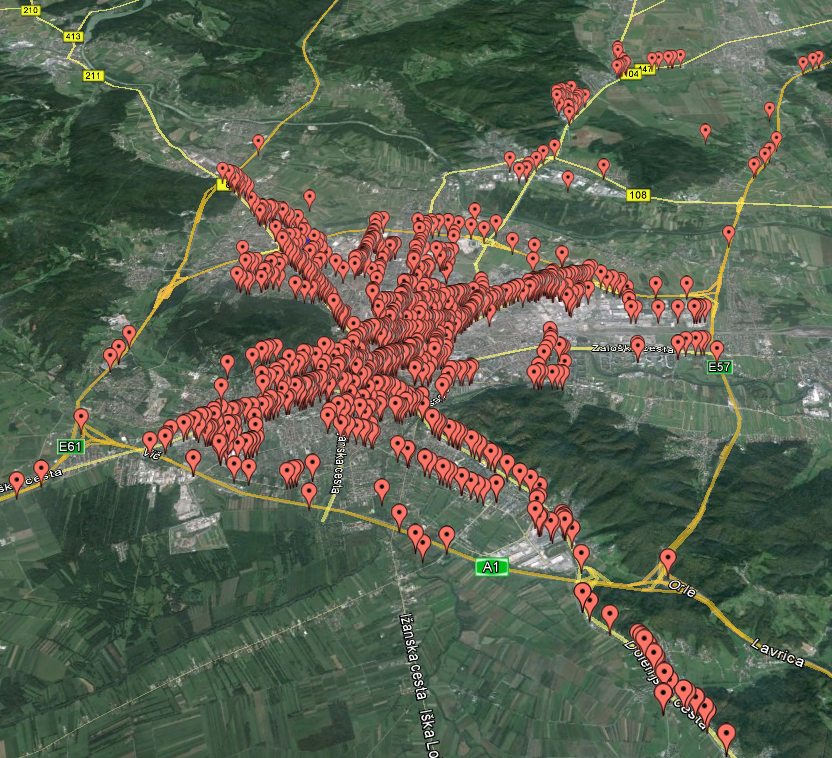
The coordinates were choosen approximately, so that urban area was covered in hole. Here are the results.
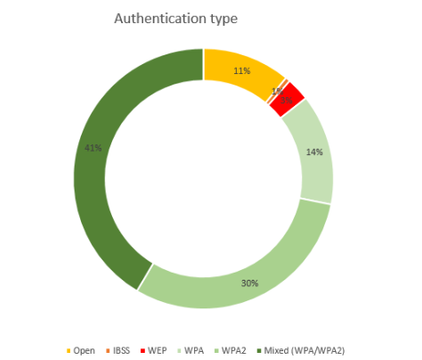
Information about 20263 AP’s was captured. Surprisingly, but from a security perspective encouraging, about 85% percent of AP’s in Ljubljana use WPA, WPA2 or Mixed authentication (WPA or WPA2). But wait a minute, not everything that shines is gold. Approximate 31 percent of these devices have WPS enabled. The implementation of WPS in AP’s is vulnerable to brute force attack where an attacker can guess the PIN number in reasonable amount of time. Firmware patches are available for AP’s that make the attack impractical by disabling PIN authentication for some amount of time when consequent invalid PIN’s supplied. But how many users did a firmware update of their device? Probably not a lot. Other vulnerabilities regarding WPS were reported, what make enabling WPS in general a bad choice?
Also about 14% of AP’s use insecure authentication (forget about IBSS which are most probably ad-hoc networks and are of topic). Why insecure? WEP was long ago and still is considered insecure and OPEN networks are just open. We must consider that the number of networks that were found to be open includes also captive portals which give some degree of protection. But from a hackers perspective captive portals are not so hard to bypass. Techniques like MAC, IP spoofing and tunneling traffic are well known and don’t require a lot of skills. There are plenty of tutorials and videos in the wild.
The overall state of Wi-Fi security in Ljubljana is not so bad. While there is room for improvement, security awareness is reaching the public or at least the vendors. We should not forget client security. When connected or before connecting to the Wi-Fi network there are plenty attack scenarios, but this is maybe a topic for another blog post. Let’s conclude with a nice figure about open AP’s in Ljubljana.
Everyone in a company is responsible for the company’s data security. A company can spend billions of dollars on all kinds of security equipment, but it only takes one person for the company’s security to be compromised [1].
Among various techniques and methods used during Penetration Test sometimes we also do “Dumpster Diving”, which involves searching throughout the trash or garbage looking for something useful to gain access to the network or to get data that helps at next steps. Seemingly innocent information like organizational charts, calendar entries, or phone records can be used in a social engineering attack.
During one of the Penetration Test projects we found documents like:
- Invoices
- Contracts
- Names
- Addresses
- Identity Card information
- Birthday dates
- Other personal information
This happens, because companies/people are not paying enough attention to what is thrown into dumpsters outside the buildings. Afterwards, the security companies performing Penetration Tests only have to put puzzles together in order to prepare attack scenarios, and infiltration into the company’s internal network is highly possible. To prevent Dumpster Diving a company should establish a disposal policy for all print-outs, storage media, etc. Additionally, all employees should be educated as well and maybe trash should not be accessed without proper permissions.
CloudFlare provides services to protect and accelerate websites. Using their services also protects against DoS in DDoS attacks. I know a large number of clients that are using these services. By using this service the real IP address of the website is hidden and so there is a better chance to survive the DDoS attack. Just googling you can find some sites that can reveal the real IP address such as http://www.crimeflare.com/cfs.html.
Going back to the challenge, I checked different pages and googled even more. I found a page where CloudFlare suggests what to do in such cases. This page can be found at this address: https://support.cloudflare.com/hc/en-us/articles/200170196-I-am-under-DDoS-attack-what-do-I-do-.
After registering at the attacked page, I tried to see if there is some leakage in their web page, but there was nothing to find. After looking a little bit more, I went another way. Since the webpage was sending out emails when registering or doing some other changes, I noticed, that there was some IP address that belongs to some hosting provider. This IP address was found in the email headers of sent emails. I verified with my friends and after just a couple of minutes, they confirmed that this is the real IP address that is under attack. They were checking a lot of things, but they didn’t expect that leakage would be coming from email headers.
So what can we learn from such an issue? We need to check all kinds of sources that can reveal the real IP address behind CloudFlare services. Webpage is just one of the things we need to check and next time be sure to check also email headers.
After they changed the IP address and fixed IP leakage from email headers, DDoS attacks stopped, and also website is no longer under the attack.
Here are some interesting links I found during my Google search:
http://smartguysays.com/find-out-real-ip-behind-clouflare/
http://geekflare.com/find-real-ip-address-of-website-powered-by-cloudflare/
http://tipstrickshack.blogspot.si/2012/11/how-to-find-real-ip-protected-by-cloud.html
Reference
[1] http://www.sans.org/reading-room/whitepapers/engineering/social-engineering-manipulating-the-source-32914
The growing number of Android-based devices, the simplified development process of Android applications and their widespread usage is attracting potential attackers that are after financial gain. By analyzing the area of security issues addressing Android applications (APK’s ), we found out that there is no such thing as a good tool to help with runtime analysis and we are too lazy to debug all the time. Therefore we developed a tool called Vaccine. Vaccine is used for dynamically analyzing APK’s. For a detailed explanation continue reading. If you just want to use Vaccine visit the link https://github.com/viris/android/tree/master/vaccine. Readme contains some additional information about how to use Vaccine.
Going Deeper
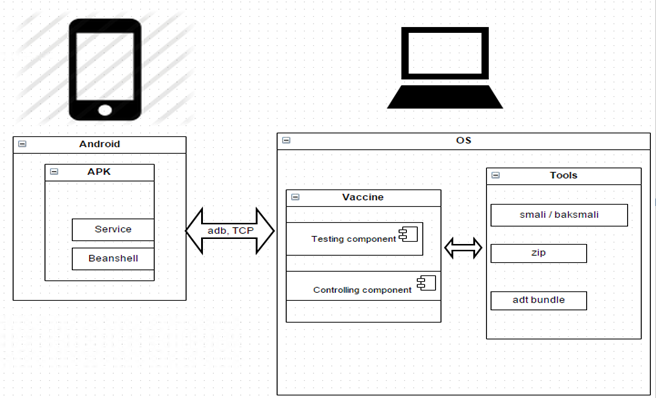
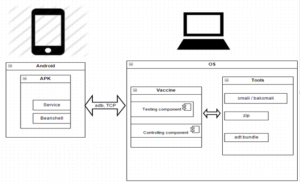
The Vaccine consists of a Testing component and a Controlling component. An environment where the Vaccine can be applied to analyze APK’s is shown below.
The environment is divided into two parts. On the left, there is the Android application with injected Vaccine Service and Beanshell, which is a Java source Interpreter [1]. Beanshell is based on Java Relection and makes it possible to execute Java source on the Android device without the need for compiling. The structure of Vaccine is shown on the right side of the picture with the tools it depends on. Communication between these two parts is established and maintained with adb which is part of the ADT bundle. We can reach the Testing component of Vaccine to start analyzing the application in two different ways. The first way is by modifying the Android application and the second is by injecting necessary components in a runtime.
Modifying the Android Application
The Vaccine Controlling component controls the preparation, modification, and installation of the Android application. At the end, it also connects to the application and shows the user interface. The whole process can be stated as:
- unzipping the APK,
- baksmaling classes.dex,
- injecting Vaccine Service and Beanshell library,
- smaling source to classes.dex,
- modifying AndoidManifest.xml,
- replacing classes.dex and AndroidManifest.xml in the APK,
- removing the signature,
- signing the application,
- installing the application,
- running the injected service,
- connecting and running the UI.
The above-described process leads to the dynamical analysis by following command:
./vaccine –i apk_file –p port_number
The first approach doesn’t require a rooted Android device, but can’t be applied if the application performs an integrity check at startup. Lack of permissions isn’t a problem, because the Vaccine changes permissions according to the permissions file included in the package.
Runtime Injection
This approach reaches the Testing component with help of ADBI [2] and DDI [3] toolkits. If the toolkits are setup correctly we need to transfer some additional libraries to the Android device into a temporary directory (/data/local/tmp) where program hijack from ADBI toolkit is already in place. The additional libraries are libvaccine.so, which is used to replace OnStart method of main Activity and vaclasses.dex which is used by libvaccine.so and represents the compiled Vaccine Service code in Java. After transferring libraries, we need to run hijack on the target like:
./hijack -d -p PID -z -l /data/local/tmp/libvaccine.so -s full.package.name
Command PID is the process ID of zygote process and full.packege.name is the name of the Android application we are targeting. So we are hijacking the zygote process and hooking the OnStart main Activity function of the target Android application. The hook imports required libraries, starts the injected service and after that runs the original OnStart function. This hook is executed only once. Now, we only need to run Vaccine as shown below :
./vaccine –r
After executing the above command we can begin with dynamical analysis.
Dynamical Analysis
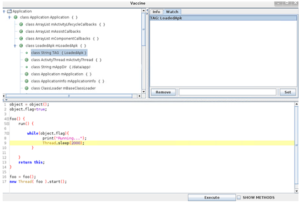
Whether we are injecting the Vaccine Service and other needed libraries by repackaging APK’s or at runtime we always end up with the Testing component of Vaccine. The front end of the Testing component (the UI) is divided into three parts. The first part in the left upper corner is a tree structure of objects that the application uses in a runtime. The root object named Application was created artificially and represents the analyzing application. One level below there are activities and the application context of the modified application. Activities are added to the root object automatically according to the Activity Lifecycle management in Android [4]. In the right upper corner of the Vaccine UI are two Views. A Status View, where are basic information about an object selected in the objects tree is shown and a Watch View, where values of chosen objects are displayed in regular time intervals. The third part of the Vaccine UI is a scripting area (below part one and two) where it is possible to write Beanshell scripts and Java source code. Scripts will be executed in a runtime under the name of the running application.
The tree object structure in the Vaccine UI responses to the four actions: double click, left click, right-click, and the combination CRL-left click. With the left mouse click, we can select the object and some information is displayed in the Status View. With the right mouse click on the object, we can expand the object. This means that the Vaccine returns all fields and methods of an object whether they are private or public and attaches them to the clicked object. By making the combination CRL-left click we can add objects to the Watch View where object values are displayed in regular time intervals. When double-clicking an object a name of this object is inserted into the scripting part of the Vaccine UI. This name is a variable that can be used in scripts.
Possibilities
The Vaccine possibilities are limited to the device and permissions of an APK on that device. On a smartphone with a custom ROM like CynogenMod that is rooted by default and with access to a system certificate it is possible to access the running Phone instance. We accomplished this by creating a new application, signing it with the system certificate, and setting in the AndroidManifest.xml the attribute sharedUserid (in the manifest element) to android.uid.system and the attribute process (in the application element) to com.android.phone. Section of code shown below presents how to get the running phone instance with the Vaccine:
import com.android.internal.telephony.*;
import java.lang.reflect.Field;
import java.lang.reflect.Method;
import android.telephony.SmsMessage;
import android.app.PendingIntent;
Phone phone=null;
__beanshellNameOfActivity.runOnUiThread (new Thread(
new Runnable() {
public void run() {
phone = PhoneFactory.getDefaultPhone();
}}));
By adding the code shown below (original code [5]) it is possible to send SMS messages with class 0:
IccSmsInterfaceManager ismsm = phone.getIccSmsInterfaceManager();
Field f = IccSmsInterfaceManager.class.getDeclaredField("mDispatcher");
f.setAccessible(true);
SMSDispatcher sms_disp =(SMSDispatcher)f.get(ismsm);
byte[] b = new byte[0];
SmsMessage.SubmitPdu pdus = SmsMessage.getSubmitPdu(null, "Phone number", "Zero SMS”, false);
size = (int)pdus.encodedMessage[2];
size = (size/2) + (size%2);
pdus.encodedMessage[size+5] = (byte)0xF0;
sms_disp.sendRawPdu(pdus.encodedScAddress,pdus.encodedMessage,null,null,"Phone number");
When injecting the Vaccine Service into useful APK’s such as Mms.apk in CynogenMode the modified application can be used as a framework. For example, it is possible to send SMS with a Beanshell script.
References
[1] http://www.beanshell.org/intro.html
[2] https://github.com/crmulliner/adbi
[3] https://github.com/crmulliner/ddi
[4] http://developer.android.com/reference/android/app/Activity.html#ActivityLifecycle
[5] https://github.com/virtualabs/ZeroSMS/blob/master/project/src/com/android/zerosms/ZeroSMS.java
Using Fiddler
Fiddler is a proxy that can intercept all the HTTP(S) traffic that’s flowing between your client and the server you’re connected to.
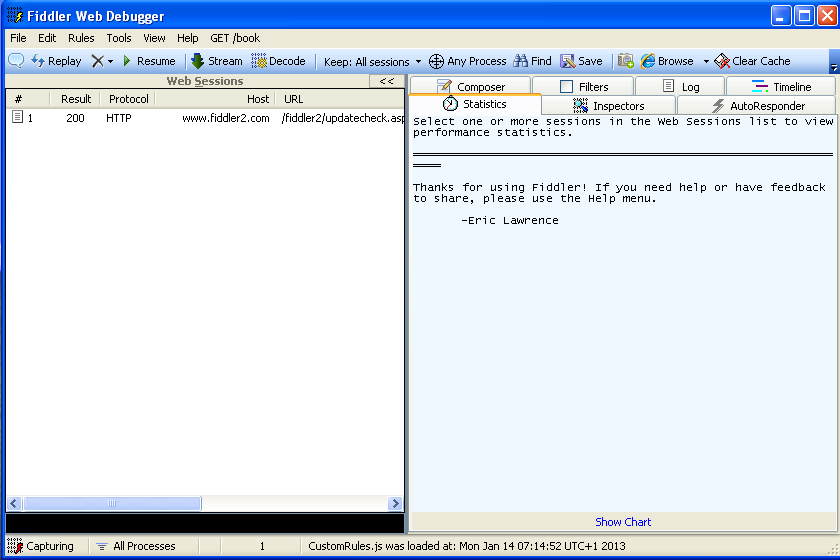
We can install Fiddler by visiting the http://www.fiddler2.com website and download the Fiddler2 or Fiddler4 based on which .NET we have installed. If we have .NET 4 installed, we can download Fidder4, otherwise download Fiddler2. Once the Fiddler executable is downloaded, we can simply install it by next-clicking. After the successful installation, we can start Fiddler. The basic Fiddler window is presented in the picture below.
Once the Fiddler is running, it should start listening on port 8888, which we can verify with a simple netstat command as we can see in the picture below.
This is all fine and all, but so what? Well, we can instruct IE or any other browser to use the port on which Fiddler is listening as a proxy, which will enable us to intercept requests and responses the browser is making in Fiddler. In our case we’ll set Firefox web browser to send requests to the Fiddler proxy on port 8888; we can do that by opening Connection Settings under the Firefox Options and setting the Manual proxy to 127.0.0.1:8888 as we can see in the picture below.
If we access www.google.com website in the Firefox now, we’ll see requests and responses flowing through Fiddler.
In the picture above we can see all requests that we sent to www.google.si webserver. Let’s explain what the columns on the picture above mean: – # : the ID of the request – Result : the HTTP status code of the HTTP response – Protocol : the protocol used by this request – Host : the hostname of the server we’re connected with – URL : the actual URL that was requested on the server – Body : the size of the body in bytes – Caching : the Cache-Control HTTP header specified in the response – Content-Type : the Content-Type HTTP header specified in the response – Custom : can be used with scripting capabilities – Comments : can be used with scripting capabilities.
Each request also has seven tabs, which are described below: – Statistics : presents various information about the session; the information is most useful if we select several sessions, because the statistics of all of them will be shown. Let’s take a look at an example.
In the picture above, we can see that we selected 185 requests, of which there are 32 unique hosts and the total bytes sent are 145.499 bytes. We can also see a summary of response codes: there were 168 responses with a response code 200, 8 with 302, 8 with 204 and 1 with a response code 307.
– Inspectors : presents the request and response in various ways. Let’s present the request and response to the www.google.si website by using the raw view; this can be seen in the picture below.
– AutoResponder: can be used to return previously generated responses instead of connecting to the server. – Composer: can be used to clone a request by drag and dropping a session into the view and execute it. – Filters: can be used to filter the session in the session view if we want for example view only the session of one of the hostnames we’re currently testing. – Log: provides a logging facility for Fiddler. – Timeline: allows us to present the HTTP session on a diagram based on time; we can select multiple sessions and all of them will be presented on the screen.
Intercept HTTPS
Let’s try to intercept Fiddler’s HTTPS traffic. If we visit URL https://www.google.com (notice that the HTTPS secure protocol is being used), the Fiddler will just pass the request through, but will not be able to actually see the contents. We can see that in the picture below.
We can see that the Fiddler has written “Tunnel to” in the Host column, which is a clear indicator that we’re connecting through HTTPS. But on the bottom half of the picture above, we can also see that Fiddler has provided a text notifying us that this is a raw HTTP tunnel that enables a client to send raw traffic through a proxy. At first glance, it seems that we can’t see the traffic that’s being sent through HTTPS, but we indeed can. To do that, we must go to Tools – Fiddler Options – HTTPS and enable the options as can be seen in the picture below.
If we revisit the HTTPS page now, we would be able to see the traffic flowing through Fiddler.
Executing Commands
At the bottom part of the Fiddler we can notice an input box, where it says “ALT-Q > type HELP…”; this is an input box, where we can enter and execute various useful commands.
The most basic commands will be described below. – ?text: when typing text, the Fiddler will select the sessions that contain that text in the URL. Let’s take a look at an example:
We’ve inputted the ?search into the input box, which effectively searches for the text “search” in the URL of each and every request. On the upper half of the screen, we can see that one session is highlighted with a gray color (the session has an ID 6). – >size: selects sessions that have the response size greater than the specified size. –
– =status: selects the responses that have the HTTP status code equal to the specified status code. The picture presents all the responses that have the HTTP response code 200 (highlighted in grey):
– =method: selects the requests that use the method to get the specific resource. The picture below presents all the requests that used the POST method to get specific resource:
– select MIME: selects the sessions whose Content-Type HTTP header equals the specified MIME type.
Breakpoints
We can also set breakpoints in Fiddler, but these are not actually the same breakpoints as in Ida Pro, Ollydbg, or some other debugger; here we’re setting a breakpoint on requests/responses, so we can intercept them before being sent and alter their values, which can be valuable in penetration testing. We can do that by clicking the Rules – Automatic Breakpoints and selecting either “Before Requests” or “After Responses” to set a breakpoint on the request or response. We can see all of the option on the picture below:
Let’s now set the “Before Requests” option to set the breakpoint on requests, so we can modify each request before actually sending it to the server. Once, we enable the breakpoint on requests, we can sent a request to a webpage like “http://www.najdi.si”, and the request will be caught and waiting for us to modify it and sent it forward to the requested server. We can see the request waiting on the picture below:
At the top of the window, we can see that we’re dealing with a request to the Host www.najd.si, but we can immediately notice something strange: the icon beside the request is red and has a letter T in it; this tells us that we’ve captured the request and is waiting to be processed. At the bottom part of the picture, we can also see the HTTP headers that will be sent to the server and the text “Breakpoint hit.” that’s written on the red background. We can now click on the Raw button above, change the HTTP headers or URI and press the “Run to completion” button to send the request to the server to be processed.
Conclusion
We’ve seen the basic introduction to Fiddler, a tool we can use to change requests and responses when trying to pentest a web application.
MiniUPnPd Analysis and Exploitation
UPnP Summary
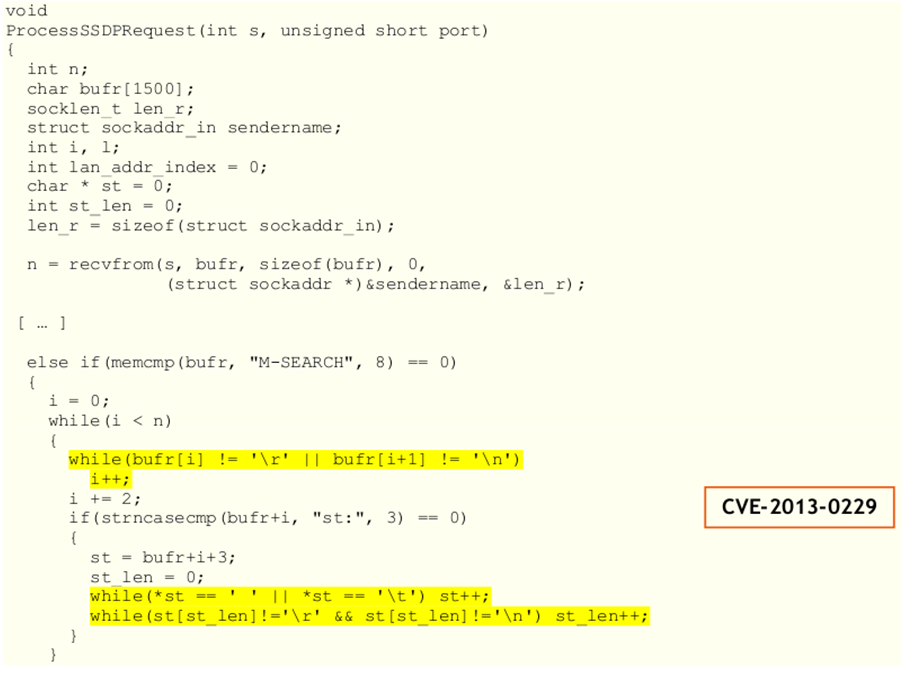
Universal Plug and Play (UPnP) is a network protocol that allows seamless discovery of network devices in order to communicate with each other. The UPnP daemons are enabled by default on various devices like routers, printers, smart TVs, etc. UPnP daemon is listening on UDP port 1900 and can expose the SOAP interface to the client. The problem is that there are various vulnerabilities present in UPnP daemon executables as well as the libraries they use which the attacker can use to exploit the target.
Stratfor.si
End of December 2011 group Anonymous attacked Stratfor (Strategic Forecasting Inc.) web page. Results were around 200 GB of important data. Among other data there have been customer information and also CC numbers. This data breach disclosed also some of Slovenian users.
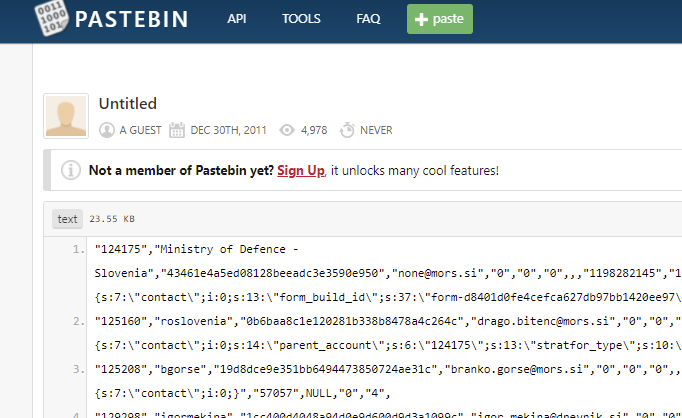
Looking from Slovenia this wouldn’t be anything special, but if we take closer look, follow some data that have been posted on Pastebin, then this looks little bit interesting. If we take a look at the list of Slovenian customers, we see that this list is quite interesting. We find people from government, ministry of defense, media houses, private companies, private unknown companies and even Catholic Church.
The way how we got to this list is also very interesting. During routine checks on Pastebin, we found some list of usernames, which looked like dumped users with lot of “gov.si” emails. There have been also MD5 encrypted passwords. First password didn’t tell anything. Second one decrypted to stratfor. After more checking we found this is list of Slovenian Stratfor users. It looks like there have been already some interest, because this list was posted on 30.12.2011 on Pastebin.
I don’t want to speculate why some people need these kind of data and for what purpose they need this data. It is just interesting to see how global data breaches influence our own small country and show information that should be kept confidential.
We didn’t post all email addresses because we don’t want get in troubles with Information commissioner but I guess you will find them easily.
List of links:
• News about attack
• Pastebin link with Slovenian users
• Search engine for leaked users